
Sea-Doo Fault Codes: Full List, Plain-English Explanations & What To Do
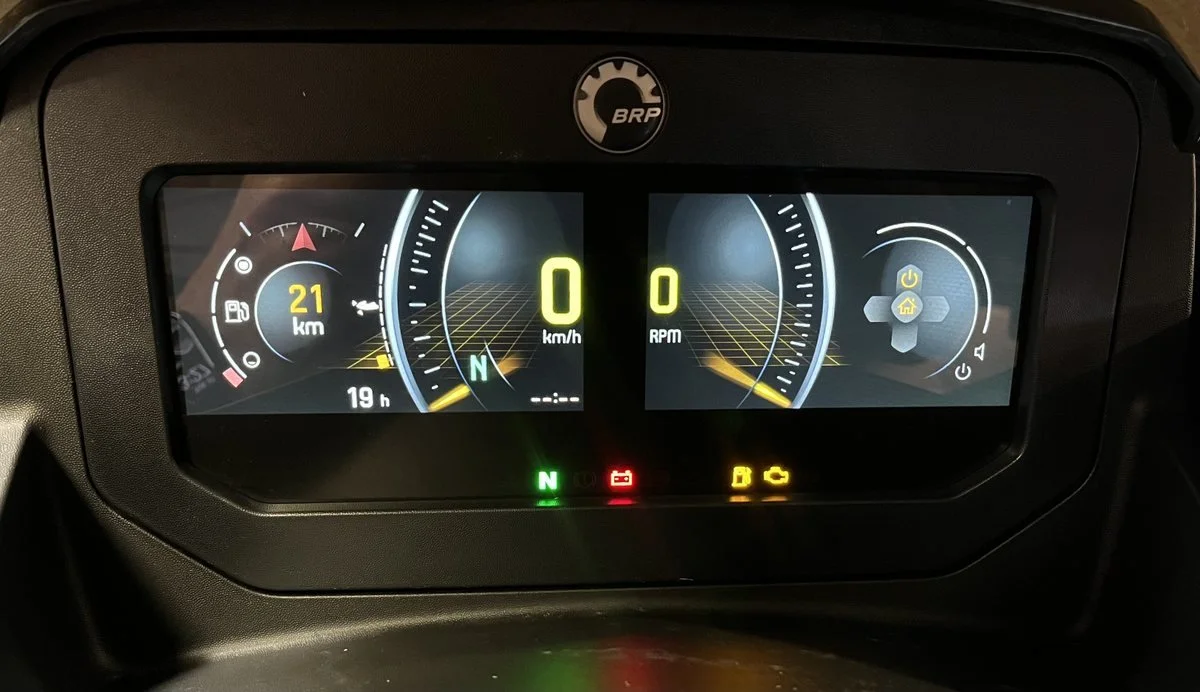
Sea-Doo BRP dash showing illuminated battery warning light and check engine light
A fault code on your Sea-Doo doesn’t have to mean a trip to the dealer and a bill you weren’t expecting. Most codes are the ECU telling you something specific — and once you know how to read that, a lot of them are either straightforward to fix yourself or easy to assess before you decide whether to trailer it in.
This article covers common Sea-Doo fault codes in plain language: what it means, what’s most likely causing it, and whether it’s something you can tackle yourself or something that needs workshop diagnostic equipment. It covers all current Sea-Doo 4-stroke models.
Check out our resource link at the bottom of this article with over 400+ Sea-Doo fault codes and what action to take.
How to Read Sea-Doo Fault Codes
When a Sea-Doo fault code is triggered, most are stored in the ECU as either an occurred fault or an active fault. Active faults — where the ECU is detecting an ongoing issue — can be viewed through the info display on the dash. All fault codes can also be read through the diagnostic port under the hood.
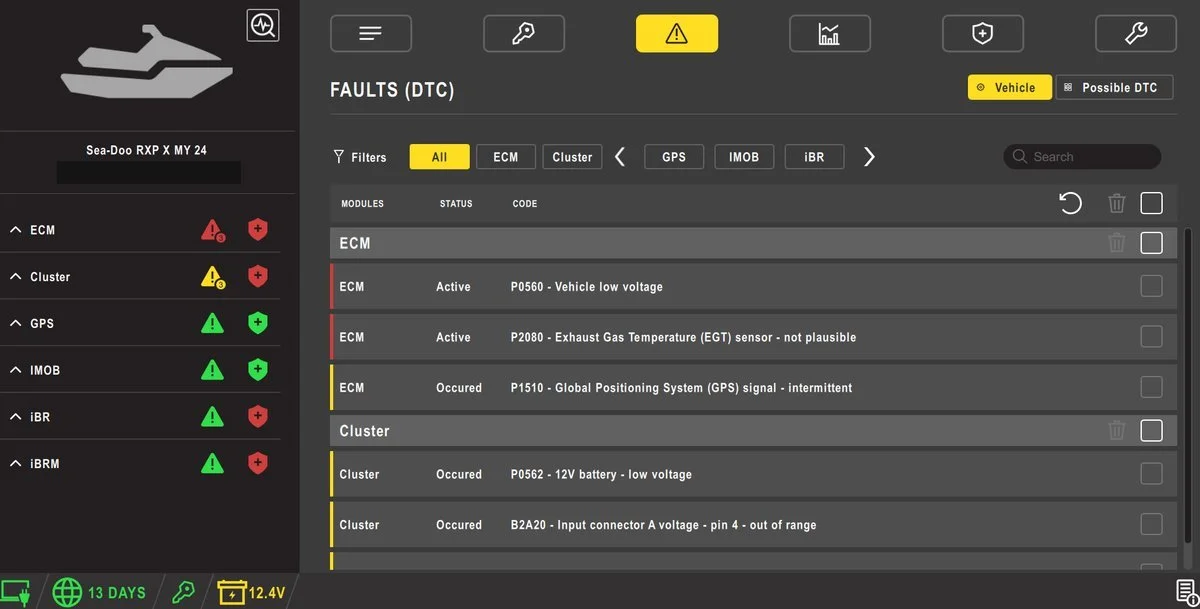
BUDS 3 diagnostic software showing active and occurred Sea-Doo fault codes across ECM and Cluster modules
There are two main ways to access them:
BUDS (Bombardier Utility Diagnostic Software) — the official dealer tool. Reads every code, shows live sensor data, and lets you run system tests. Most independent Sea-Doo workshops will have this.
Aftermarket diagnostic software — systems based around the BUDS protocol, or performance tools like the RIVA Maptuner, that allow you to read and clear fault codes.
A full guide to reading Sea-Doo fault codes with BUDS and third-party readers is coming soon. In the meantime, the sections below cover what each code means once you have the number.
⚡ ALWAYS CHECK THE BATTERY FIRST
A weak or partially flat battery is the most common cause of false fault codes on Sea-Doos. Before you diagnose anything, test the battery voltage:
12.7V = fully charged and healthy · Below 12.4V = needs a charge · Below 12.0V = recharge, test and if needed replace it
A battery below 12.4V at rest — or one that drops significantly under cranking load — will trigger fuel system codes, DESS key errors, fuel sensor faults, and iBR voltage codes that disappear the moment you fit a good battery. Always eliminate the battery first. We check this in the driveway before the ski comes into the workshop — it’s a 5-minute fix that saves a lot of time.
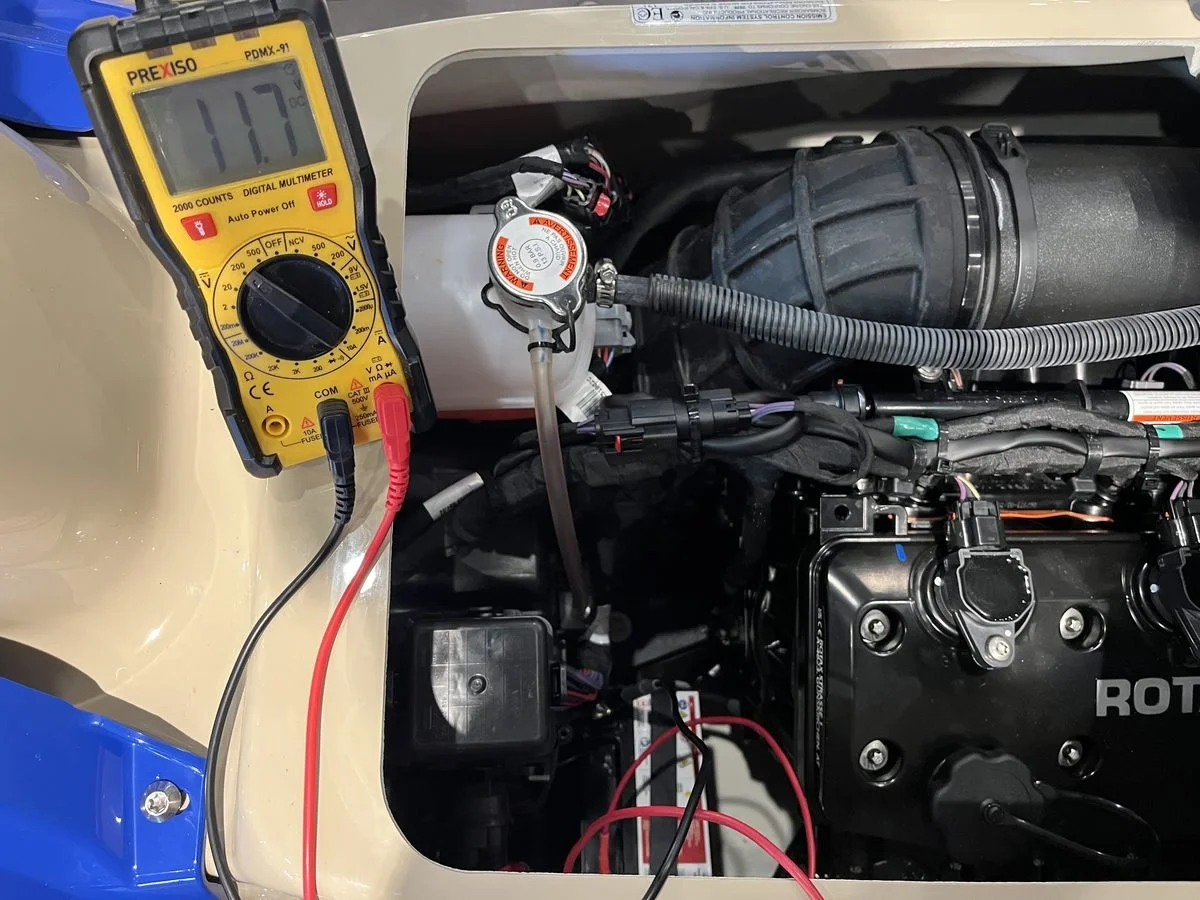
Testing Sea-Doo battery voltage with a multimeter — 11.7V reading indicates the battery needs charging
Warning Lights and What They Mean
Fault codes are divided into categories based on the electronic module that triggers them: ECU, Cluster, iBR, iBRM, and iMOB. Here’s how to read the warning lights that accompany them:
Engine light: Orange. Engine shape icon. Indicates an active code — can appear alongside other warning lights.
Oil light: Red. Oil can with a drip icon. Indicates an active oil system issue.
Temp light: Red. Thermometer icon. Indicates an overheat condition in one of the liquid cooling systems.
Battery light: Red. Battery icon. Indicates a battery voltage issue.
iBR light: Red. “iBR” lettering. Indicates an issue with the braking system.
Maintenance light: Orange. Indicates the service interval has elapsed since the last reset via diagnostic software. This is a countdown timer only — it does not detect the actual condition of service items.
Note: some units with monochrome displays show icons in black on an orange LCD screen.
Engine Light vs Limp Mode
If the ECU detects any anomaly from a sensor it will trigger an engine light on the dash, accompanied by a buzzer. If the fault is likely to cause permanent damage, the ski will go into limp mode. This doesn’t shut the engine off — it limits available power to an absolute minimum so you can get to the nearest safe point.
Limp mode is typically triggered by engine overheating, low oil pressure, or iBR faults.
First Check for Any Sensor Fault
Before chasing a sensor fault, check the electrical plug first. A disconnected plug, or water and corrosion inside the connector, can give false readings and is the quickest fix before you start looking for deeper issues.
Fault Code Guide
Exhaust Overheat
Common codes: P2428, P0544, P0545
Indicates the exhaust system has exceeded safe temperatures. Usually triggers limp mode. Triggered by the temp sensor in the waterbox.
What to check: Check for debris in the jet unit — anything caught in the pump creates cavitation and restricts water flow through the exhaust cooling system. Sticks, seaweed, or a hat can cause this. Also check for blown cooling lines — corroded clamps can fail under pressure and blow off the exhaust manifold or water feed from the jet unit. A quick visual inspection inside the hull for excess water or a loose cooling line can find this fast.
Fix level: Garage fix, unless further damage is found — then workshop.
💡 Pro Tip
Exhaust overheats are detected quickly by the temp sensor and alarmed by the ECU, but if you’re slow to shut down, secondary damage can occur to the exhaust hose, plastic sound baffle, and exhaust temp sensor. Inspect all three after repairing an exhaust overheat.
Engine Overheat
Common codes: P0217
Indicates the closed-loop coolant system has exceeded safe temperatures. Usually triggers limp mode.
What to check: Check coolant level — visible in the coolant tank. Check for blown coolant hoses, particularly from rusty clamps on the water pump housing low in the bilge (very common). Occasional water pump housing failures can blow the thermostat out of the housing and drain all the coolant. Also inspect the plastic ride plate fitting, which deteriorates over time — look for signs of coolant inside the engine bay and excess corrosion on the ride plate.
Fix level: Blown clamp is a garage fix. Anything else is usually a workshop job.
Oil Temperature Overheat
Common codes: P0298
Indicates engine oil temperature is above safe operating limits.
What to check: If there are no engine cooling faults or codes, high oil temperature is almost always caused by a blocked oil cooler. The fix is replacing the oil cooler and flushing the coolant system.
Fix level: Workshop fix.
Low Oil Pressure
Common codes: P0523, P0524
Indicates low or no oil pressure in the oil system.
What to check: Check the oil level first — see Owner Manual for correct procedure to check oil level for your Sea-Doo model. If oil is low, look for signs of oil in the engine bay. Common leak points: corroded oil temp sensor crush washers (very common in salt water environments), and rear main seals. If the oil level is normal, check the oil filter — a blocked filter can restrict flow and trigger a low oil pressure fault, commonly caused by water contamination in the oil.
Fix level: Crush washer replacement is a garage job. Rear main and further pressure issues require a workshop inspection.
💡 Pro Tip
Low oil pressure warnings only trigger above 4500 RPM. You’ll need to run the ski on the flush and bring the RPM up to confirm whether the fault is cleared after a repair.
MAP Sensor
Common codes: P0106
The ECU is reading intake pressure outside the expected range.
What to check: Usually a blown intercooler charge hose — check hoses off the supercharger, intercooler, or throttle body. If all hoses are fitted correctly, the intake manifold may have split along the seam, leaking boost pressure. Run the ski on the flush and give a sharp burst of throttle with your hand alongside the manifold, feeling for pressurised air escaping.
Fix level: Blown hose is a garage fix. Intake manifold replacement usually requires a workshop.
Low Voltage
Common codes: P0562
The ECU is detecting lower than required voltage.
What to check: Battery first — it’s the number one check for almost every code that comes through the workshop. Loose battery terminals also cause a huge range of faults. Check the 30A charge fuse in the fuse box. Rectifier failures are not uncommon — plug in a known good unit to test and eliminate the stator/reg-rec.
Fix level: Battery and terminals are a garage fix. Reg/rec is easy to swap. If it points to the stator, that’s a workshop job.
High Voltage
Common codes: P0563
The ECU is detecting higher than required voltage.
What to check: A dropped cell in the battery can give irregular voltage readings. Lithium batteries can also cause issues with the Sea-Doo charging system. If the battery and terminals are good, high voltage can only be caused by a failed regulator/rectifier. Swapping the reg/rec will resolve this.
Fix level: Generally a garage fix.
💡 Pro Tip
I don’t recommend lithium batteries in Sea-Doos. Removing them has eliminated a significant number of fault codes I’ve seen in the workshop.
Injector Faults
Common codes: P0201, P0202, P0203
The ECU has detected an injector fault causing a misfire.
What to check: Check all injectors are plugged in and verify 12V supply at each injector plug. Remove the rail and perform a spray test to confirm all injectors are firing normally.
Fix level: Injector diagnosis is a garage job. If it becomes a wiring issue it may need a workshop.
💡 Pro Tip
Injector failure is rare. The cases I see are usually from extended non-use or salt water damage. Getting injectors cleaned and flow-tested on higher-hour Sea-Doos has improved performance and fuel economy noticeably.
Ignition Coil Faults
Common codes: P0351, P0352, P0353, P2300, P2303, P2306
Indicates an ignition coil fault causing a misfire.
What to check: Confirm all coil connections are properly seated. The older push-in stick coils failed frequently. The newer bolt-in coils are very reliable. Coils can be swapped between cylinders to identify a faulty one.
Fix level: Garage diagnosis. Coil replacement is straightforward.
Misfire
Common codes: P0300, P0301, P0302, P0303
Indicates weak or no combustion in one or more cylinders.
What to check: Spark plugs first — old, wet, or fouled plugs are the most common cause. Check fuel quality and inspect for water in the fuel. If the misfire code is paired with an O2 sensor fault, the sensor is affecting fuel delivery and will need to be replaced.
Fix level: Spark plugs are a garage job. O2 sensors are accessible and can be changed at home with the right tools. Water contamination in the fuel tank usually requires the pump to be removed and cleaned — workshop job.
OTAS (Off-Throttle Assisted Steering)
Common codes: P1550
Indicates an off-throttle assisted steering sensor fault.
What to check: Check the plug to the sensor for corrosion — this is usually the issue. If the plug is clean, check for 12V at the purple wire at the plug. If both check out, the sensor has failed.
Fix level: Garage fix.
Fuel Level Sensor
Common codes: P0460, P0461
Indicates a fuel level sensor fault.
What to check: Most fuel level sensor faults I see are linked to a voltage issue — low or high voltage gives an irregular reading to the cluster. Check for any voltage codes first. If the fuel pump plug is connected and no voltage issues are present, the level sensor may have failed. Take a fuel sample — excessive water in the system can cause erratic level sensor readings.
Fix level: Voltage check is a garage job. If the level sensor itself needs replacing, the fuel pump module must be removed from the tank — workshop job.
Fuel Pump
Common codes: P0231, P0232, P0627
The ECU has detected the fuel pump is not operating normally.
What to check: Check the fuel pump fuse (shared circuit with injectors). Confirm the pump plug is connected. When you press the power button with the key on, listen for the fuel pump prime for a few seconds. If voltage is present at the fuel pump plug and there’s no prime, the pump has most likely failed. Salt water corrosion inside the tank is the most common cause of pump failure.
Fix level: Sea-Doo sells complete pump modules. Aftermarket pumps can be fitted to your existing module. Either way, this is a workshop job.
Fuel Pressure
Common codes: P0089
Fuel pressure is not following the target reading. (325 models with O2 sensor.)
What to check: Confirm the fuel pump is working correctly and the fuel line is not kinked or leaking. This is usually a failed pressure sensor. The sensor is located on top of the fuel pump module outside the tank.
Fix level: Relatively accessible — garage fix for most.
O2 Sensor
Common codes: P2232, P2270
O2 sensor reading is out of range or irregular.
What to check: Usually a failed O2 sensor. If paired with a misfire or fuel pump fault, investigate those first. Salt water is the primary cause of O2 sensor failure.
Fix level: The O2 sensor is easy to access and can be replaced at home.
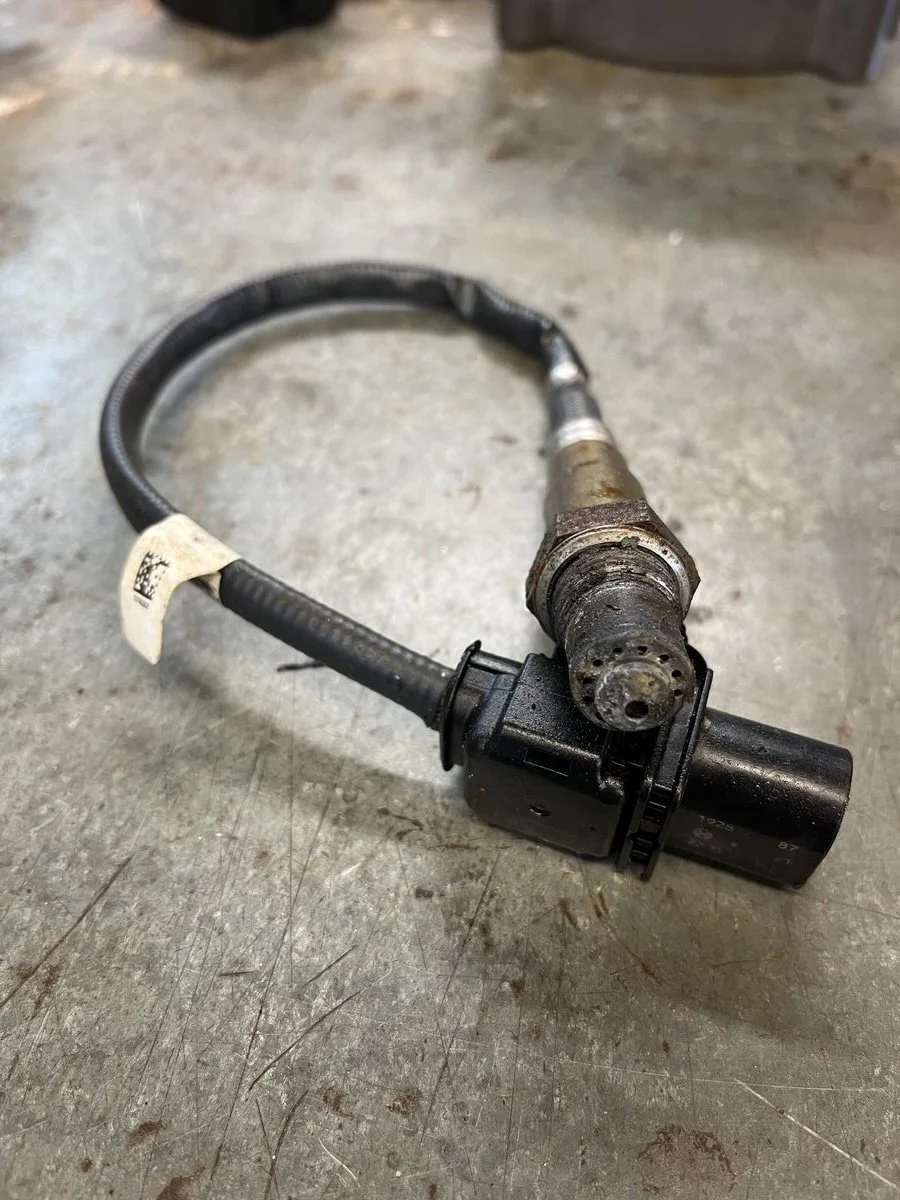
Failed Sea-Doo O2 sensor showing heavy salt water corrosion — common cause of P2232 and P2270 fault codes
Throttle Body
Common codes: P1614, P060E, P1120, P1619, P1620, P1622
Indicates a throttle body fault.
What to check: Remove the intercooler hose and check the throttle butterfly by pushing on it — it should return freely. A sticking throttle body is the most common fault and will immediately trigger limp mode. If the butterfly doesn’t return fully or is locked, the throttle body needs replacing.
Fix level: Throttle body replacement is four bolts and a garage job, but often requires a throttle body reset through diagnostic software after fitting. May still need a workshop visit for the software reset.

Sea-Doo throttle body showing the butterfly valve — sticking here is the most common cause of throttle actuator fault codes
iBR (Intelligent Brake & Reverse)
Common codes: C2101, C2102, C0042, C0043, U0129
The ECU has detected an issue with the iBR brake module.
What to check:
Check voltage first — the iBR draws significant power to move the reverse bucket, and any voltage issues will cause faults.
Check the iBR bucket at the jet pump for debris or binding on damaged pivot points.
Check the 30A iBR fuse in the fuse box.
Check the 6-pin plug between the steering harness and main harness (next to the coolant tank) and the main iBR module plug for corrosion.
At the main iBR plug, check: 12V at the red pin, 12V at the purple pin (key must be on), and earth at the large black pin. If voltage and earth are present at the module, the iBR module itself has most likely failed.
Fix level: If plugs and voltage check out with no signs of corrosion, the ski needs a workshop.
💡 Pro Tip
If you can’t see F, N, R on the dash, it’s usually a sign there’s no power reaching the iBR module — focus on power, harness, and plug issues first.

Sea-Doo iBR bucket and jet pump area showing pivot points and reverse gate — inspecting for debris and binding
Throttle Accelerator Sensor (TAS)
Common codes: P0122, P0222
Irregular reading from the throttle sensor on the handlebars.
What to check: Check the plug connection between the main harness and steering harness, and the plug at the throttle sensor on the handlebars. Also check the throttle body — these faults are closely paired. Sensor failure is less common than wiring or throttle body issues.
Fix level: If plugs and throttle body are fine, this may need a workshop.
Brake Lever Sensor
Common codes: C0042, C0043
Irregular reading from the brake sensor on the handlebars.
What to check: Check the plug connections between the main harness and steering harness, and at the brake sensor itself. Also check the iBR module — these faults are closely paired. Sensor failure is less common than iBR module failure or wiring issues between the handlebars and the module.
Fix level: If plug and harness checks look clean, this needs a workshop.
Cam Sensor
Common codes: P0340, P2614
Irregular or absent signal from the cam sensor.
What to check: Check for 12V at the orange/green wire with the key on and dash powered. If voltage is present, it’s most likely sensor failure. These were a common failure point on 2022–23 model year skis.
Fix level: Garage fix.
Knock Sensor
Common codes: P0325, P0326
Irregular or implausible signal from the knock sensor.
What to check: Check fuel condition and spark plug condition — both can trigger engine knock. Check the sensor connection. If everything looks normal, sensor failure is the likely cause.
Fix level: The sensor is accessible via one bolt but sits under the intake manifold. Replacement usually means a workshop visit.
TOPS (Tip-Over Protection Switch)
Common codes: P1502, P1505, P1106
Indicates the watercraft has detected an inverted orientation.
What to check: If the ski is the right way up: confirm the sensor is clipped in correctly under the engine breather — fitting it upside down will also trigger this fault. If the clip and plug look correct with no corrosion, the sensor has failed.
Fix level: Easy to access. Garage fix.
GPS / Speed Sensor
Common codes: P1510
Weak signal, GPS disconnected, or GPS failure.
What to check: Check GPS is not blocked or obstructed (such as when ski is stored inside). Check connector for corrosion. A failed GPS unit will also affect speed-based riding modes and speed control features.
Fix level: Connector check is a garage job. GPS unit replacement is straightforward.
What To Do When a Code Appears
Test the battery first. Always. A weak battery causes more false codes than any other single issue.
Read the full code number. Not just the warning light. The specific code tells you exactly which system is affected.
Check the relevant section above. Review the likely cause before touching anything.
For garage-level codes: Follow the likely cause. Clear the code after your repair and do a test ride to confirm it doesn’t return.
For workshop-level codes: If the ski is still running, ride conservatively to get it off the water, then trailer it. Don’t push a ski with an active workshop-level fault.
If a code returns after clearing: The root cause is still present. Clearing codes without fixing the cause delays the inevitable — and usually makes it more expensive.
🔧 Sea-Doo Fault Code Reference Tool
Search all 411 Sea-Doo fault codes by number or keyword — full cause and action for each one. Free, no login, works on your phone at the ramp.